Code Debugging (I): Understanding Debug Mode
During development, bugs are our best friends (and our worst enemies). Debug Mode is the most powerful "detective tool" ArenaPro provides, allowing you to lift the "hood" of your code to see what's really happening inside, helping you quickly locate and fix problems.
Why Do We Need Debug Mode?
By default, when you build your project, ArenaPro minifies and obfuscates the code. This is like enclosing a car in a sleek, sealed shell to make it run faster. The advantage is that the code is smaller and runs more efficiently, making it suitable for official release.
But when the car breaks down, this sealed shell becomes a nightmare.
- Production Mode (Debug Off): The code is compressed into a single, unreadable line, with variable names changed to
a,b,c. If an error occurs, it's very difficult to know which line of source code caused the problem. - Debug Mode (Debug On): The code remains as you wrote it, preserving all spaces, line breaks, and variable names. If an error occurs, it will tell you precisely: "Hey, the
playerScorevariable on line 52 of your code has an error!"
| Mode | Code Characteristics | Pros | Cons |
|---|---|---|---|
| Production Mode | Minified, obfuscated, unreadable | High performance, secure | Difficult to debug |
| Debug Mode | As-is, fully readable | Easy to debug | Lower performance, insecure |
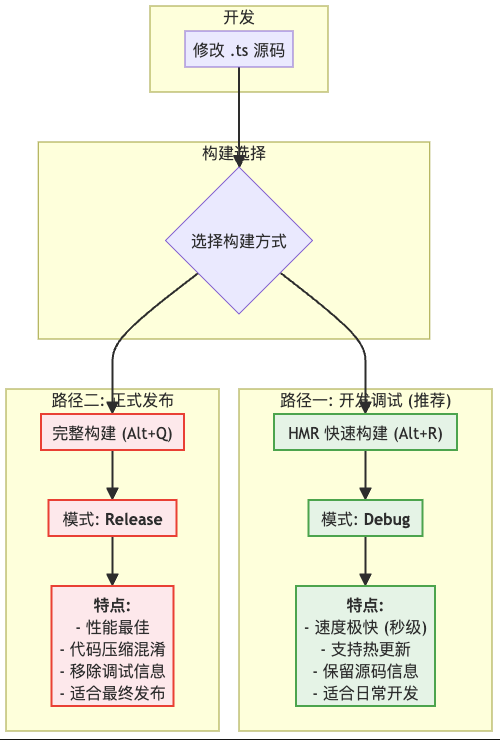
The difference between the two workflows can be summarized in the diagram below:
How to Enable Debug Mode?
Enabling Debug Mode is very simple and requires just one configuration step:
- Open the
dao3.config.jsonfile in your project's root directory. - Find the
typescriptconfiguration section and set thedevelopmentfield totrue.
// dao3.config.json
{
  "ArenaPro": {
    "file": {
      "typescript": {
        // "server" and "client" control the server and client respectively
        "server": {
          "development": true // true: Enable server-side Debug Mode
        },
        "client": {
          "development": true // true: Enable client-side Debug Mode
        }
      }
    }
  }
}Info
💡 Important Tip After modifying the configuration, you must rebuild the project (Alt + Q) for the new mode to take effect.
A Typical Debugging Workflow
Suppose you find a bug in your game. You can follow this process to solve it:
- Enable Debug Mode: Modify
dao3.config.jsonand save. - Rebuild: Press
Alt + Qto upload the readable code to the map. - Reproduce the Bug: Enter the game and perform the actions to trigger the bug.
- Check the Console: Open the game console. You will see a very detailed error message, usually pinpointing the source file name and line number.
- Locate and Fix: Based on the error message, go back to VS Code and modify your TypeScript source code.
- Disable Debug Mode: After fixing the bug, remember to change
developmentback tofalseand build again for final testing or release.
Frequently Asked Questions (Q&A)
Q: Should I always keep Debug Mode on?
A: No. Debug Mode is only for the development and debugging phases. Because the code it generates is large and unoptimized, it will affect game performance. Please make sure to turn it off before releasing your game.
Q: What does the developmentAll setting do?
A: This is a shortcut switch. If you set developmentAll to true, it will force both server-side and client-side Debug Modes to be enabled, ignoring the individual settings under server and client. You usually don't need to use it.
Q: Can I directly modify the compiled JS files in the dist folder to debug?
A: Strongly not recommended. You should always modify the *.ts source files and then update the code through the build process. Directly modifying the build output will cause inconsistencies between the source code and the running code, leading to greater confusion.
Understanding the difference between these two modes is fundamental to efficient development and high-quality delivery. In the next section, we will learn how to use HMR (Hot Module Replacement) to further improve development efficiency.