Hello World: Your First ArenaPro Script
Congratulations on completing all the preparations! Now, it's time to create something with your own hands and feel the magic of ArenaPro.
In this tutorial, we will accomplish a classic task together: displaying a welcome message to players when they enter the map.
You will experience the core development workflow of ArenaPro: ① Write Code → ② Build and Upload → ③ Run and Test.
Ready? Let's get started!
Step 1: Write the Server-Side Code
Our goal is for the "server" to execute the logic for showing a pop-up window when a new player joins the game.
- In the VS Code file explorer on the left, find and open this file:
server/src/App.ts. - It may contain some default code. Please clear it all out first.
- Then, copy and paste the following new code into it:
// This code means:
// When any new player (onPlayerJoin) joins this world,
// we execute the operations inside the parentheses.
world.onPlayerJoin(({ entity }) => {
  // From the joining player's entity,
  // we find their player information (player) and make them execute a dialog command.
  entity.player.dialog<GameTextDialogParams>({
    type: GameDialogType.TEXT,
    title: "Greetings from the Server",
    content: `Welcome, ${entity.player.name}!`,
  });
});Code Explanation: We are listening for the onPlayerJoin event. As soon as a player enters, we call the dialog API to display a simple text dialog on their screen. We also use ${entity.player.name} to get the player's name, making the greeting more personal.
🤔 Want to dive deeper into the mysteries behind the code?
- What's the difference between
entityandplayer?- Why is it recommended to use
.tsfiles instead of.js?- What do
GameTextDialogParamsand the angle brackets<...>do in the code?We have prepared a dedicated guide to answer these questions. After completing this hands-on tutorial, we recommend reading: TypeScript vs. JavaScript Guide
Step 2: One-Click Build and Upload
The code is written. Now we need to perform some "magic" to transfer it from our VS Code "studio" to the Box3 "cloud construction site."
- Make sure you are in the VS Code window.
- Press the magic shortcut key
Alt + Q. - Alternatively, you can click the
Buildbutton in the bottom-right corner of the VS Code window.
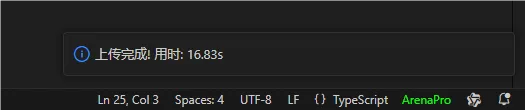
You will see the "Terminal" panel at the bottom of VS Code start working, scrolling through a lot of information. Don't worry, this is our "robot assistant" compiling and packaging the code for you.
When it finally displays the green text “✅ [build] Packaged and uploaded successfully”, it means your code has successfully arrived in the cloud!
Step 3: Run in the Game
Everything is ready. Although our code has been uploaded, we still need to tell the game engine: "Hey, go load the new code I just uploaded!"
Return to your Box3 Creator End.
Under the "Script" tab in the "Editor" interface, find and open the server-side entry script
index.js.At the very top of the script, add (or ensure you have) the following line of code:
javascriptrequire("./_server_bundle.js");The purpose of this line is to load all the server-side logic we uploaded via ArenaPro.
Click the “Run” button at the top of the creator end.
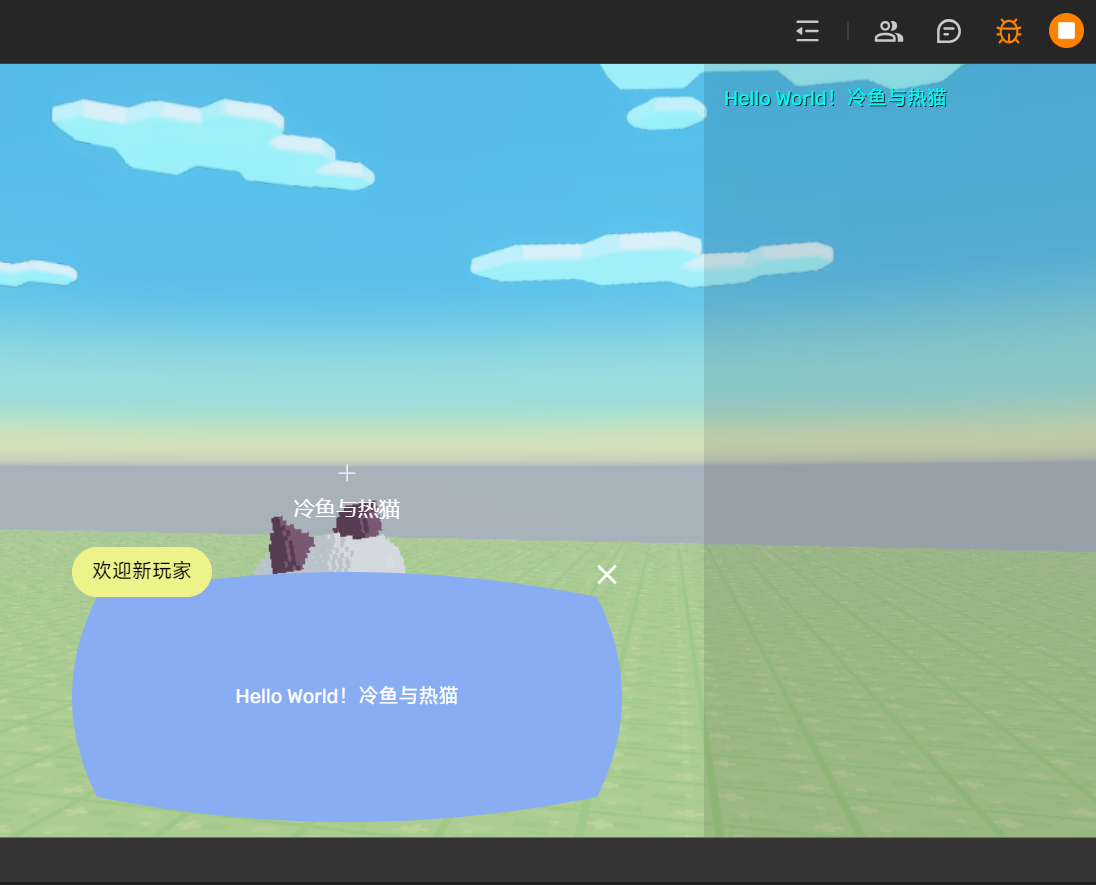
Now, exit and re-enter your map. You should immediately see the welcome dialog we designed pop up on your screen!
✅ Congratulations, Your Journey Begins!
You have successfully experienced the core development loop of ArenaPro. This “Write → Build → Run” pattern will be part of all your future creative processes.
Now that you have mastered the basic development workflow, you can start exploring freely, try modifying the dialog content, or take on more complex gameplay challenges.
Happy creating!